Pages

Wednesday, July 10, 2013

Baked Falafel and Tzatziki Sauce (with a side of Phineas and Ferb)


If you're a parent of young children, you are familiar with that incredible window of productivity known as your child's nap time. Since my 2-year-old blessedly still takes an afternoon nap, I try to get as much done as possible during those couple of quiet(er) hours of the day. My 6 and 4-year-olds are still very much awake at that time, but Legos are a beautiful thing for keeping them entertained...well, Legos and pummeling each other to the ground in what they call "Wrestle Fight." (Did I mention they're girls?...haha, just kidding.)

When my 2-year-old was younger and wouldn't sit through a TV show while I made dinner, I relied on nap time to get prep work done on dinner, easing the pain of her standing at the baby gate screaming her guts out while I chopped vegetables...really not fun for either of us. Since then, the routine of doing dinner prep in the afternoons has become second nature, especially if I want to make a meal that takes longer than a Phineas and Ferb episode. When I meal plan, I typically gravitate toward recipes that I can chop/grate/mix/layer ahead of time.

This is one such recipe. You can mash the chickpeas, chop and process the onions, parsley, and garlic, mix it all up with some egg, spices, and bread crumbs, and mold the result into patties in maybe 20 minutes:


Finished patties before cooking

Stash in the fridge until dinner time and it's ready to bake. Same goes for the tzatziki...without the baking, obviously. This leaves your 24 minutes of Phineas and Ferb for things like checking Facebook and enjoying a glass of wine. 

Baked Falafel and Tzatziki Sauce
(Adapted from Allrecipes.com)

Ingredients:

3/4 c. Greek yogurt
1/2 cucumber--peeled, seeded, and finely chopped
1 tsp. dried dill weed
1 1/2 tsp. lemon juice
1/2 tsp. garlic powder
salt and pepper to taste

1 15-oz. can garbanzo beans, drained
1 small onion, chopped
2 1/2 Tbsp. dried parsley
2 cloves garlic, chopped
1 egg
2 tsp. ground cumin
1/2 tsp. dried cilantro
1 tsp. salt
1 dash pepper
1 pinch cayenne pepper
1 tsp. lemon juice
1 tsp. baking powder
1 Tbsp. olive oil
3/4-1 c. dry bread crumbs

In a small bowl, mix the Greek yogurt, cucumber, dill weed, lemon juice, garlic powder, salt, and pepper. Chill for at least 30 minutes.

In a large bowl, mash chickpeas until thick and pasty. In a blender, process onion, parsley and garlic until smooth. Stir into mashed chickpeas.

In a small bowl combine egg, cumin, coriander, salt, pepper, cayenne, lemon juice and baking powder. Stir into chickpea mixture along with olive oil. Slowly add bread crumbs until mixture is not sticky but will hold together; add more or less bread crumbs, as needed. Form balls and then flatten into patties. (I got 13 smallish patties.)

Preheat oven to 400 degrees. Line a baking sheet with foil. Spray foil with high-quality vegetable oil cooking spray, then place falafel on foil and spray them as well. Bake for 10 minutes, then flip and spray falafel again. Bake another 10 minutes. Finally, broil 1.5-2 minutes on each side.

Serve with tzatziki sauce (and other fixin's as desired, such as pita, tomato, spinach, etc.)

Saturday, July 6, 2013

Lemon-Thyme Granita


I always used to be skeptical of granita. Typically containing only three ingredients--fruit juice, water, and sugar--it kinda sounds like some Weight Watchers trick to make you think juice is dessert. (Nice try, Weight Watchers.) But then I started making it, starting with this fancy-schmancy lime recipe, and I've been hooked ever since. It still doesn't exactly fit the bill for a "real" dessert in my book (I think my definition for real dessert is "must contain fat") but it is a lovely, light, refreshing after-dinner palate cleanser. Any fruit juice will do to make it. I've tried grapefruit, watermelon, lime, and lemon, and I'm especially curious to try this sangria version.

This time around, I happened to have a couple of lemons hanging around waiting to be put to some culinary use, so Dear Old Uncle Google willingly obliged an appropriate recipe. I love the unique twist the thyme infusion gives the flavor here--a subtle depth that balances the lemony sweetness nicely. Excellent for a little something different!

Lemon-Thyme Granita
From Taste of Home

Ingredients:

1 c. water
2/3 c. sugar
2/3 c. fresh lemon juice
2 fresh thyme sprigs

In a small saucepan, bring water and sugar to a boil. Cook and stir until sugar is dissolved. Remove from the heat; stir in lemon juice and thyme. Transfer to an 8-in. square dish; cool to room temperature.

Remove thyme sprigs. Freeze for 1 hour; stir with a fork. Freeze 2-3 hours longer or until completely frozen, stirring every 30 minutes.

Stir granita with a fork just before serving; spoon into dessert dishes. Yield: 2 cups.


Thursday, July 4, 2013

Red, White, and Blue Berry Cheesecake Parfaits


Since my last post was about Christmas, I guess I'll get back to reality and focus on the holiday actually at hand: the 4th of July! Happy Independence Day! As with most holidays, I imagine everyone has their own food associations for the 4th, probably usually to do with things you can smother in ketchup--burgers, hot dogs, cheesecake...


Wait--did someone say cheesecake?  

I don't actually smother my cheesecake in ketchup, but I do associate any kind of creamy, berry-topped dessert with the 4th of July. My aunt would always make one of those Jell-O and Cool Whip concoctions with a berry stars and stripes flag on the top. But a cheesecake topped with berries would be even better, yes? (I guess now would be the time to tell you that my love for cheesecake is so extreme that my husband proposed to me with one AND we had it as our wedding cake...if that tells you anything.)

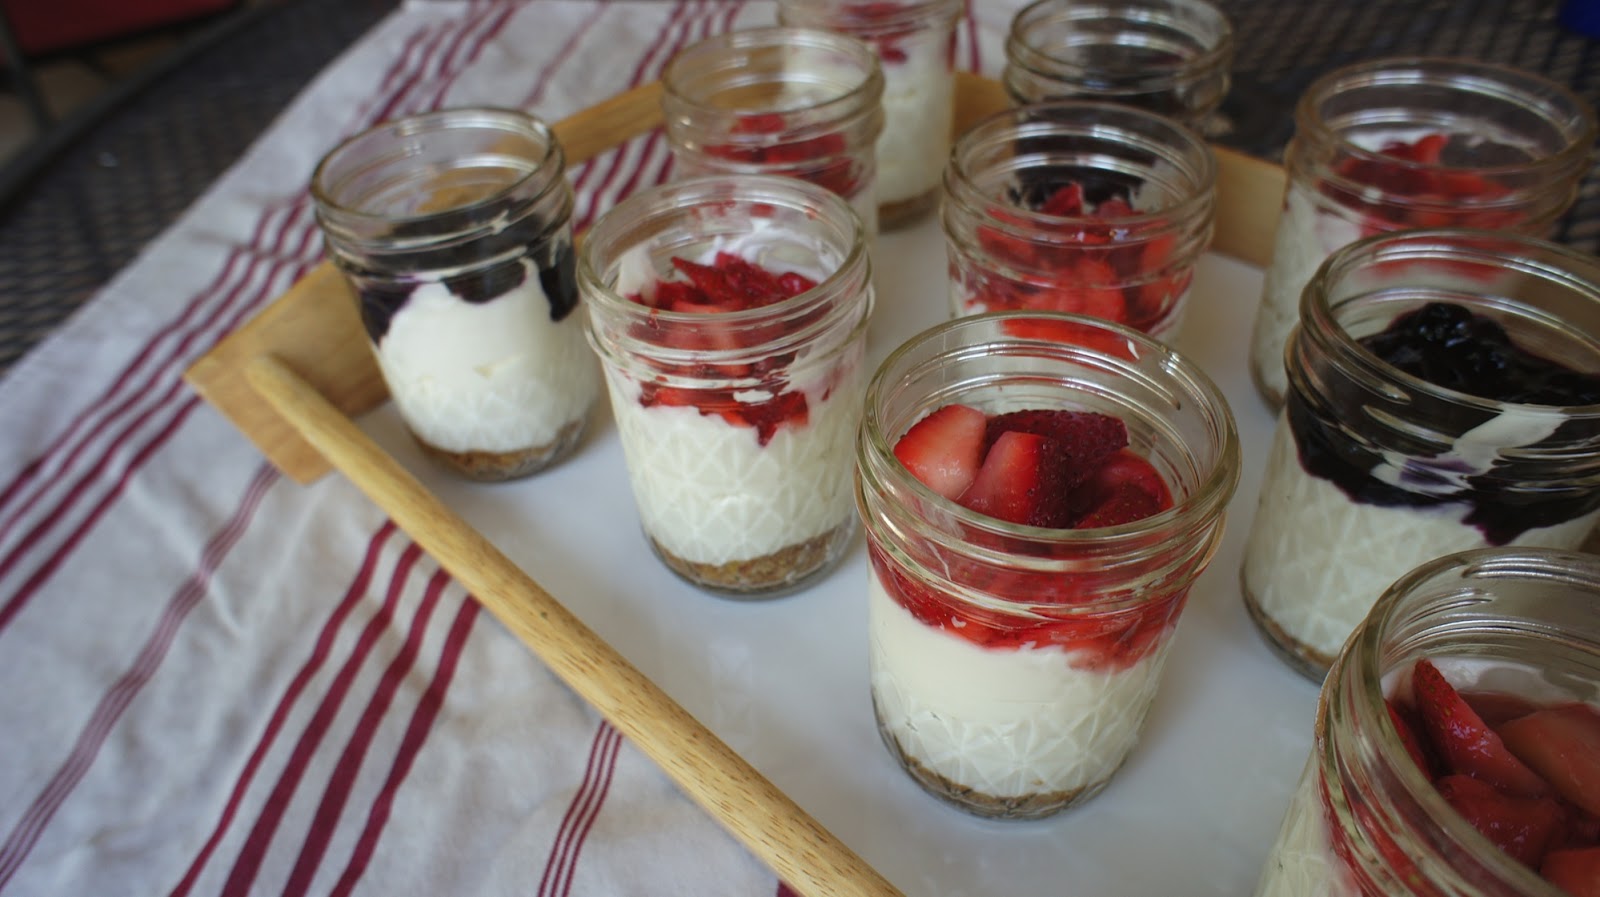
Our neighborhood 4th of July potluck has been on my radar for a few weeks now, and I knew I wanted to bring dessert. When I saw this lovely recipe, it looked like the perfect choice, especially since I happened to have some 8 oz. jelly jars laying around from when I made strawberry jam. It definitely took some time to put these together, since there are several steps (and since I doubled the recipe), but they are certainly simpler to make than an actual cheesecake. Not only that, the Greek yogurt stands in for quite a bit of the usual cream cheese. Most cheesecake recipes I've seen call for four to five 8 oz. blocks of cream cheese, where this recipe took only two 8-oz. blocks for 15 parfaits. 


How about you? What kinds of food do you associate with the 4th of July, and which are your favorites to make?

Red, White, and Blue Berry Cheesecake Parfaits
(From Annie's Eats)

Ingredients:

For the strawberry topping:
1½ cups chopped strawberries
2 tbsp. granulated sugar
For the blueberry topping:
1 cup fresh blueberries
3 tbsp. granulated sugar
1½ tsp. cornstarch
2 tsp. water
Squeeze of fresh lemon juice
For the graham cracker base:
¾ cups graham cracker crumbs
1 tbsp. granulated sugar
1½ tbsp. unsalted butter, melted
For the cheesecake layer: 
8 oz. cream cheese (reduced fat is fine)
2 cups low-fat greek yogurt
1½ cups confectioners’ sugar, sifted
1 tsp. vanilla
1 tbsp. heavy cream
To make the strawberry topping, combine the strawberries and sugar in a small bowl and toss with a fork to combine.  Let stand at least 1 hour, stirring once or twice, until the berries have released their juices.  Mash the berries a bit with the fork.  Cover and refrigerate until ready to use.
To make the blueberry topping, combine the blueberries and sugar in a small saucepan over medium-high heat.  In a small pinch bowl, whisk together the cornstarch and water until smooth.  Stir the berries occasionally when they begin to release their juices.  Once the juices are bubbling, stir in the cornstarch mixture.  Continue to cook, stirring frequently, until the mixture bubbles and thickens.  Remove from the heat, stir in the lemon juice.  Transfer to a bowl, cover, and refrigerate until ready to use.
Set out 8 8-oz. mason jars (small glasses will also work).  In a small bowl, combine the graham cracker crumbs, sugar, and butter.  Stir with a fork until evenly combined.  Scoop about 1½ tablespoons of the mixture into the bottom of each jar and tamp down gently with the bottom of a small glass.
To make the cheesecake mixture, combine the cream cheese and greek yogurt in the bowl of an electric mixer.  Scrape the seeds from the vanilla bean into the bowl.  Beat the mixture on medium-high speed until smooth, about 1-2 minutes.  Add in the confectioners’ sugar and mix until well incorporated, 1-2 minutes.  Blend in the vanilla and heavy cream on low speed, then increase the speed to medium-high and beat until light and fluffy, 2-3 minutes more.  Divide the mixture between the serving jars.  Spoon the blueberry topping over 6 of the servings.  Spoon the strawberry topping over the remaining servings, partially draining of the excess juices before using.  Cover and refrigerate until ready to serve.

Tuesday, July 2, 2013

Christmas in July: Raspberry Eggnog Trifle


IIIIIII'm dreaming….of a whiiiiite…..Christmas….

Actually, no. I'm just dreaming of a day I can walk outside without feeling like my organs are going to melt right out of my body. This last week in Mesa, AZ has been outrageously hot. You'd think I would be used to it by now, having lived in the Phoenix Valley since I was two years old, but you know, when it's 119 degrees outside, I don't care who you are, it's just too dang hot. I could swear I saw the Heat Miser from A Year Without a Santa Claus trying to sneak into an air conditioned movie theater the other day. Even with the A/C on in my house, my bag of chocolate chips was literally melting when I walked into the pantry to grab a heaping handful before dinner. 

With all this organ-and chocolate-chip melting heat, I am trying to savor those moments throughout the day when I can actually get cold (in my car, usually, or at JC Penney's where the middle-aged ladies work). I am also reminding myself that I truly would rather be excessively hot than excessively cold. Four years of college in Chicago have drilled that into my psyche pretty firmly. And yet, I can't keep my thoughts from turning to fantasies of winter and Christmas. And if I'm going to fantasize, it might as well include food, right?

This showstopping dessert was one of the features at our Christmas party this past year. The party is an annual tradition eight years running, and as a foodie/obsessive planner, I view it as my time to shine. I spend weeks preparing the menu, and in addition to an array of Christmas cookies, I always try to include one other fabulous dessert in the lineup. The more jaw-droppingly decadent, the better. This delightful trifle fit the bill. Technically, I realize this may be considered cheating to blog about something that I actually made six months ago...but it really was that good. And if you substitute the eggnog for regular milk, this could easily transition to a summer dessert. A trifle is one dish that has the aesthetics and versatility to pull off any time of year. And if you decide to make it now, at least it won't heat up your kitchen. :)

Raspberry Eggnog Trifle

Ingredients:
2 4-oz packages vanilla instant pudding mix
3 1/2 c. eggnog (or milk)
1/4 tsp. nutmeg
2 c. heavy cream
2 Tbsp. powdered sugar
1 1/2 tsp. vanilla extract
1 purchased angel food cake, cut into cubes
2 12-16-oz packages frozen raspberries (or 24-32 oz fresh)
24 whole graham crackers, crushed

Chill a mixing bowl and beaters in the freezer for 5-10 minutes. Prepare the pudding mixes using the package directions, substituting the eggnog for the milk, if using. Blend in the nutmeat; set aside.

Beat the cream with the powdered sugar in the chilled bowl until soft peaks form. Fold in the vanilla.

Layer 1/3 of the angel food cake, 1/3 of the pudding, 1 1/2 cups of the raspberries, 1/4 of the graham cracker crumbs, and 1/3 of the whipped cream in a trifle dish. Repeat the layers twice to form three layers. Garnish with the remaining raspberries and graham cracker crumbs. Chill before serving. Serves 24.


Monday, July 1, 2013

Peanut Butter Cheerio Bars


Do you ever get those custom-selected-just-for-you coupons in the mail from your local grocery store? The kind you're happy to get because they're mostly for things you buy, but at the same time give you that creepy feeling that they know just a little too much about you? I have such a love-hate relationship with those grocery club cards. They give me such sweet discounts and yet they're like little plastic spies that report back to HQ about everything I buy. Double-edged sword.

Anyway, for some reason, in one of these recent mailers, I got a coupon for a free box of plain Cheerios. Totally scot free--no "buy this, get that" hanky-panky. This struck me as a little odd (though I'm sure it's totally calculated) because I have never in my life purchased plain Cheerios, not even when my kids were babies. Undoubtedly, the good old Kroger corporation wants to offer me these free Cheerios in the hope that my kids and I will like them and become repeat buyers. Well, sorry, Kroger, you lost that gamble…but if you're gonna give me a box for freeeeee, I'm sure as heck gonna take it.

The problem is, the coupon was only good for the enormous box-to-end-all-boxes size of Cheerios. This one:


(pictured with monster finger puppets for scale)

I think Neil Armstrong was the first man to set foot on this box of Cheerios. This leaves me with 18 bajillion ounces of plain Cheerios and no one who genuinely wants to eat them. (Knowing this, I was going to donate them to church, but ended up opening them when my 4-year-old wanted to try them…then he decided they weren't flavorful enough and that he didn't want them after all.) Okay, so 18 bajillion ounces of plain Cheerios minus the approximately 12 my 4-year-old ate. 

This being the case, I thought I'd try my hand at making cereal bars. My kids consider the granola bars from Trader Joe's a special treat (probably has something to do with them being covered in chocolate), so I'm hoping these Cheerio bars hold the same sway. Plus, it's always nice to feed them something that doesn't contain palm kernel oil, soy lecithin, and other mystery ingredients--though, admittedly, these are a bit high in sugar. Kids are asleep right now (how else would I be blogging uninterrupted, right?) so I'll have to let you know the verdict in the morning!

Peanut Butter Cheerio Bars
(Adapted from Allrecipes.com)

Ingredients:

1/2 cup white sugar
1/2 cup honey
1/2 cup peanut butter
3/4 cup rolled oats
3 cups toasted oat cereal (aka "we're not allowed to say Cheerios")

In a large saucepan over medium heat, stir together the sugar and honey. Bring to a boil (large bubbles bursting on surface) and stir for one minute, then remove from heat and stir in the peanut butter until well blended. Stir in the rolled oats and cereal. Use a strip of wax paper to press into a generously greased 9 inch square pan. Allow to cool until firm, then cut into bars.


Saturday, June 29, 2013

Cinnamon Apple Muffins


Muffins are the little black dress of baked goods. They are endlessly versatile--accessorize them with add a little of this, a little of that, dress them up, dress them down, and you (almost) always end up with a hand-held paragon of yumminess that everyone wants for breakfast. I am always in search of new muffin ideas. With three little kids that can't make their own breakfasts each morning, muffins are my go-to for tossing on a plastic Ikea kids' plate with a little butter and calling it good.

These little beauties I found on this super cute blog that not only has plenty of recipes, but also some cool sewing tutorials. They turned out delish! Nothing fancy, but nice and easy and a great way to use up the extra apple that always seems to be rolling around forlornly in my fruit crisper. Give them a try!

Cinnamon Apple Muffins
(Adapted from Little Miss Kimberly Ann)

Ingredients:
3/4 c. all-purpose flour
1/2 c. rolled oats
1/2 c. whole wheat flour
1/2 tsp. salt
2 tsp. baking powder
1 tsp. cinnamon 
1/2 c. sugar 
1/4 c. oil
1/2 c. milk
1 egg
1 medium apple, peeled and chopped 

Preheat oven to 400 degrees. Grease 8 cups of a muffin tin. Combine the first 7 ingredients in a medium bowl and mix until combined. Add the oil, milk and egg to the dry ingredients and stir until just combined. Fold in the apples. Spoon batter into the 8 muffin cups. Bake for 17-20 minutes, or until tops are golden brown.

Thursday, June 27, 2013

Kitchen Victories: Rosemary Crusty Bread

Okay, so this is the recipe that made me realize I was really asking too much for anyone reading my other blog (which doesn't exactly have a theme, but is definitely not a food blog) to keep indulging me posting about food. If I'm gonna keep posting about food, might as well start a food blog, right?  I've been so inspired by some incredible food blogging ladies like Annie of Annie's Eats, Christy of The Girl Who Ate Everything, and Shawnda of Confections of a Foodie Bride that I feel like I just want to add to the conversation about great food. Indulge me and have a look at this beautiful bread.


I never, ever thought I could or would make a bread like this in my own kitchen. I've come a long way as a home cook since the early days of my marriage when I made a list of things I knew how to make (It went something like this: 1. Omelets, 2. Burritos, 3. Fish Sticks.) But as time has passed and I've expanded my repertoire, I've realized that cooking is one small, relatively safe area of my life in which I can consistently try new things, and therefore progressively conquer little fears. As someone who is always trying to shake the specter of fear and anxiety from my life, this gives me confidence. My little kitchen victories--learning to use the broiler, cooking with jalapeƱos, finally buying and using a food processor--remind me that the best way to fight a fear is to face it. Same is the case with yeast breads--one of those things I have long had an irrational fear of making. Not like I thought it was going to morph into a menacing, drooling dough monster…more just like I thought I would screw it up. Bread is something you buy from the grocery store, where the bakery elves have made it magically appear, not something normal people make on their countertops. There's all that rising time, the mysterious and somewhat nasty foaminess of the yeast, and then what are you supposed to bake it in? 

Well, luckily, in the case of cooking, all you really usually have to do is follow the recipe. (If only everything else in life were so clear-cut!) I found this delightfully simple recipe after deciding to bust through my yeast bread angst by hunkering down and making some. And what do you know? It turned out awesome, rather like the pre-meal bread you get at Carrabba's or Macaroni Grill. I've made it three times now, and this last time I added rosemary for a different flavor. Take that, yeast angst!

What are some of your kitchen victories--things you've been afraid to cook but went ahead and tried anyway? How did they turn out?

Rosemary Crusty Bread
(Adapted from Simply So Good)

Ingredients:
3 cups unbleached all purpose flour
1 3/4 teaspoons salt
1/2 teaspoon Instant or Rapid-rise yeast
2 Tbsp. chopped fresh rosemary
1 1/2 cups water

In a large mixing bowl, whisk together flour, salt and yeast, and rosemary.  Add water and mix until a shaggy mixture forms.  Cover bowl with plastic wrap and set aside for 12 - 18 hours.  (Overnight works great.) Heat oven to 450 degrees.  When the oven has reached 450 degrees place a cast iron pot with a lid in the oven and heat the pot for 30 minutes.  Meanwhile, pour dough onto a heavily floured surface and shape into a ball.  Cover with plastic wrap and let set while the pot is heating.  Remove hot pot from the oven and drop in the dough.  Cover and return to oven for 30 minutes.  After 30 minutes remove the lid and bake an additional 15 minutes.  Remove bread from oven and place on a cooling rack to cool.