Pages

Monday, November 18, 2013

Pumpkin Butter

 
Whoa. Did you have any idea that pumpkin butter is super easy to make? I didn't. Having made apple butter before, which is practically tantamount to bottling your own wine, I always assumed that other "butters" of the fruit/vegetable variety would be the same way. When you make apple butter, you have to first cook down the apples into sauce, then put the sauce in a crock pot or on the stovetop for like 10-12 hours, stirring as you go. It's like potty training--you can't leave your house for an entire day for fear of a goopy mess. (Not saying it's not worth it; it's just really time-consuming.) 

Pumpkin butter, on the other hand, takes you from canned pumpkin to autumn-flavored bliss in 30 minutes. Who knew? Basically, you just dump some simple ingredients in a saucepan and simmer as they combine to reach that velvety consistency that's smooth as, well, butter. Try this and you'll never go back to the expensive-by-comparison store-bought version!

And since this recipe is so quick and easy, I've been daydreaming about the many uses for this creamy, pumpkiny treat. Here are some that come to mind:
  • in oatmeal
  • on toast/muffins/scones
  • on top of cornbread for a lovely fall-inspired twist (alongside pumpkin chili, perhaps?)
  • in yogurt
  • in place of jam in thumbprint cookies
  • as a cake filling
  • with cream cheese, powdered sugar, and butter for a sinful Pumpkin Butter Frosting
  • as a unique homemade Christmas gift
Tell me your favorite use for pumpkin butter!


Pumpkin Butter
(Adapted from Allrecipes.com

Ingredients:

1 15-oz can pumpkin puree
1/4 c. plus 2 Tbsp. apple juice
3/4 c. sugar
1 tsp. ground ginger
1/4 tsp. ground cloves
1 tsp. ground cinnamon
1/2 tsp. ground nutmeg

Directions:

Combine pumpkin, apple juice, sugar, and spices in a large saucepan. Bring mixture to a boil. Reduce heat and simmer, stirring frequently, for 30 minutes or until thickened and creamy.

Transfer to sterile container and chill in the refrigerator.

Makes 1 pint jar.


Wednesday, November 13, 2013

Carrot Apple Bread


So the big news this week at our house is that we're getting solar panels installed. I for one am super excited about this (clean energy! lowered electric bills! coolness factor!) The only downside of the whole process is that for the better part of one whole day, your power has to be shut off. As someone who uses a heavy duty hair straightener every day so I don't look like Cher in some terrible '70s Merv Griffin appearance, this news was disappointing. 


NOT JOKING
Still, in a weird way, there's a part of me that couldn't help treating it like an experiment. With all the post-Apocalyptic story lines in recent TV/movies/books, you kinda have to wonder how you would respond if you were suddenly thrown back a couple hundred years in terms of technology. Going without power for one day is like a teeny tiny fraction of that experience, I know, but it's one of those things that's worthwhile as an occasional reminder of all we take for granted having electricity.

Anyway, we belong squarely in the 21st century, and tend to rely heavily on our toaster for breakfasts. That being the case, I decided to bake this carrot apple bread the night before the power outage--since I wasn't up to the challenge of attempting it over an open fire the following day. (Yes, we could have had cereal and milk. I felt like baking anyway.) The funny thing is that before breakfast I drove to Starbucks for some coffee (again, not willing to MacGuyver some camping-style version of coffee in my fireplace) and was approached by a barista standing in the drive-thru handing out samples. She was handing out--you guessed it--apple bread. Well, Caramelized Apple Cake, to be more precise. Of course it was super tasty, as cake for breakfast always is. So when I got home and sat down to this bread, the contrast in sugar content seemed drastic. There was probably as much sugar in one ketchup-cup sample of Starbucks' apple bread as in this entire loaf. After I got over the sweetness disparity, though, I felt proud of myself. Why? Because I have learned that breakfast doesn't have to be drenched in sugar to be delicious and satisfying. (I didn't used to know that. Years ago I would buy those giant trays of grocery store cheese danish, stick them in my freezer, and hack one off every morning.) And believe me, this bread is plenty sweet! It's just not Stabucks-drive-thru-breakfast sweet, which is actually a good thing. It has both a fruit and a vegetable, a beautiful, fluffy texture, and that soft-but-firm exterior I love so much in a well-done breakfast bread. Substitute up to 1/2 cup of the white flour with whole wheat to make it even heartier.

All in all (if you were wondering) we survived our day without power. No one died, and no one had to cook anything in the fireplace. No one even had to poop in the woods! So it was way better than camping. Now let's just hope no zombie Apocalypse happens in my lifetime. I'm not ready to go that hard-core.


Carrot Apple Bread
(Inspired by How to Cook Everything Vegetarian by Mark Bittman)

Ingredients:

2 c. all-purpose flour
2/3 c. packed brown sugar
1/2 tsp. baking soda
1 1/2 tsp. baking powder
3/4 tsp. salt
4 Tbsp. butter
1 egg
3/4 c. milk
1 c. loosely packed shredded carrots
1 small apple, chopped

Directions:

Preheat oven to 350 degrees. Grease a 9 x 5 inch loaf pan.

Stir the dry ingredients together. Cut the butter into pieces, then use a fork or two knives to cut it into the dry ingredients. (I used a food processor to make this step faster.)

Beat together the egg and milk. Pour into the dry ingredient mixture and stir until just moistened. Fold in the carrots and apple. Pour batter into the prepared pan.

Bake about 1 hour, or until a toothpick inserted in the center comes out clean.

Wednesday, November 6, 2013

Halloween Candy Bark


When you have little kids, there are lots of wonderful bonuses to the weeks following Halloween. You get to bask in the memories of your children in their ridiculously adorable costumes:


You get to breathe a sigh of relief that it's all over and you don't have to hand-stitch any more Super Mario hats:


And most importantly, you get to eat their candy when they're sleeping. (Don't tell them I said that.) The downside of this, of course, is that you frequently end up eating waaaayy too much candy. And so do they. To combat this sugar juggernaut this year, I decided to make use of the overload of goodies that ended up in my pantry after trick-or-treating--both from my kids' bags and from what we didn't pass out--and make candy bark for my husband to take to work. (This way other people get all the calories I'm trying to avoid....muwahahaha.) I found recipes for candy bark online, but didn't have the ingredients most of them listed, so I decided to wing it. (It's kind of hard to screw up graham crackers, chocolate, and candy, right?) The result was scrumptious! My husband's co-workers downed them and asked for more the next day. So if you're reading this because you ate this treat at a certain development/design company in Tempe, AZ....this one's for you!


Halloween Candy Bark

Ingredients:

14 whole graham cracker sheets (or 28 half sheets)
1 12 oz. bag semisweet chocolate chips
1 1/2 tsp. vegetable oil, divided
1/2 c. peanuts, chopped
3 c. Halloween candy of your choice
1/2 c. white chocolate chips

Directions:

Line a large cookie sheet with wax or parchment paper. Spray lightly with cooking spray. Lay graham crackers closely together on cookie sheet until sheet is filled. 

Using a vegetable chopper or a sharp knife, chop Halloween candy into small pieces. Mix in a medium bowl with peanuts. Set aside.

In the microwave or a double boiler, melt chocolate chips. Stir in 1 tsp. vegetable oil. Pour over graham crackers and spread out until crackers are covered. Sprinkle peanut-candy mixture evenly over chocolate. Refrigerate until chocolate has hardened, at least 15 minutes.

In the microwave or double boiler, melt white chocolate chips. Stir in 1/2 tsp. vegetable oil. Drizzle melted white chocolate over the top of the bark. (For perfect drizzling, place melted white chocolate in a Ziploc bag with a small hole snipped off one bottom corner. Squeeze bag gently to drizzle.)

Return pan to the refrigerator until white chocolate has hardened, at least another 15 minutes. Remove bark from wax paper and place on a large cutting board. Cut into bite-sized pieces. Store in an air-tight container in the refrigerator.


Monday, November 4, 2013

Butternut Squash and Carrot Soup

Uggghh, I know this picture is not the greatest. Dang you, non-natural light!
As an adult--and even as an aspiring dietitian--I have retained a childish stubbornness about trying certain unfamiliar vegetables. Eggplant, for example, seems like a big-bottomed purple flesh monster. And lima beans could be delicious, for all I know, but I remember hating them as a child, so you bet I'm not touching them with a 39 1/2 foot pole now! Don't even get me started on collard greens.

Butternut squash is another one that alerts my veggie stranger danger. It never made the meal rotation in my household growing up, so I never ventured to try it in any other context. But in recent years, I've tried to swallow my inner protestations and make the effort to tackle some new vegetables, one at a time. As with trying anything else new, some things I end up liking, some things I don't. (Bok choy, kale, endive, and parsnips, get a thumbs-up. Beets and artichokes, thumbs-down.)

Having done quite a bit of reading in the last year on the wisdom of eating seasonally, I decided butternut squash made the short list for must-try vegetables this fall. Now, having eaten it, I don't know what I was so apprehensive about! If you've never had it, it's not unlike pumpkin--creamy and a bit nutty. Plus, it contains an off-the-charts level of Vitamin A and is a good source of Vitamin C. 

We've had this soup twice now. (My husband raved about it the first time, so I made it again a couple of weeks later.) It comes together quite simply, with a velvety texture and noticeable hint of nutmeg. We like it as a main dish with cheesy bread or a salad, but it could also serve as a lovely first course for a dinner party. If nothing else, it's worth making just for the incredible aroma that will fill your home as it simmers! 

Butternut Squash and Carrot Soup
(Slightly adapted from Better Homes and Gardens)

Ingredients:

1 Tbsp. butter
3 c. peeled, diced butternut squash
2 c. thinly sliced carrots
3/4 c. diced onion
28 oz. chicken broth (homemade makes this especially delicious)
1/4 tsp. ground white or black pepper
1/4 tsp. ground nutmeg
1/4 c. half-and-half
Sour cream (optional)

Directions:

In a large stock pot, melt butter over medium heat. Cook squash, carrots, and onions in butter for about 8 minutes, stirring occasionally. Add broth. Bring to boiling; reduce heat. Simmer, covered, 25-35 minutes, or until vegetables are very tender.

Using an immersion blender (or in batches in a food processor/blender with a tight-fitting lid), puree the soup until smooth. Return to stock pot. Add pepper and nutmeg; bring just to boiling. Add half-and-half; heat through. Garnish with sour cream, if desired.

Sunday, November 3, 2013

9 Ways to Simplify This Holiday Season


You might already have two questions about this post:

(Read these in your best Jim Gaffigan voice-in-the-audience's-head tone)

1. Why is she talking about the holidays? It's only November 3rd. Is this going to be one of those "Christmas Creep" things where we're supposed to pretend the Christmas season starts the day after Halloween?

2. Does this have to do with food? If not, why is it on this blog? I thought the name was "A Love Letter to Food." If it doesn't have to do with eating, I'm going back to Paula Deen's Miracles of Cool Whip on Food Network.

Well, that was significantly more than two questions, but the short version of the answers goes like this:

1. No, I am not participating in Christmas Creep! I am participating in the opposite! (Which for the sake of this blog, let's call "Christmas Drag.")

2. No, it doesn't particularly have to do with food, but It's my blog, so I can still write about it. ;) But I promise this won't happen too often.

The reason I bring all this up in early November is that this weekend I went clothes shopping at a couple of department stores and was totally overwhelmed with the craziness of Operation Christmas In Your Face. You know about this, right? As soon as the doors close on the trick-or-treaters, stores all around the country haul out their holiday bells and whistles and start trying to brainwash you into believing Christmas is just around the corner. Which, okay, it sort of is--but going into these stores seriously stressed me out. I felt like it was December 23rd, not November 3rd. The lines were long, there was Christmas music playing, Christmas decorations and ads everywhere, AND the lady behind me in line banged her cart into my ankle so hard I almost started crying in line. 

It's the most wonderful time of the year.

I came home with a resolution to simplify my holiday season this year. No one wants to feel harried, stressed, and bossed around by someone else's agenda--commercial, familial, or otherwise--at the time of year that's supposed to be about peace on earth and goodwill toward men. I know this is not a new story. It's a repeat problem, one we all lament year after year. But my sense is that the lamenting doesn't get us very far. This thing has to be approached with a PLAN.

So I gave it some thought and here are 9 of things I plan to do to this year to keep the sugar plums dancing in my head from driving me nuts...unless we're talking about candied almonds. Then I'm on board. 

1. Shop Online (aka Stay Away From Retail Stores in November/December)
No parking, no crowds, no lines, no annoying music, no overtired children (except for my own, but I can just put them to bed since, hey, I'm at home). Buying online, you are less likely to make impulse buys like those Godiva chocolates that seem to be at so many registers. Plus, I've learned there is SO much more selection of original gifts available online than at the mall. Etsy.com is one place to start; also check out the personalized gifts at Zazzle.com.

2. Plan Ahead. 
It is only still November! If you get shopping and planning done little by little starting now, you have a guarantee of less stress down the road.

3. Keep an Excel Spreadsheet of Gifts and their Cost, Recipients, and Total Spending.
For me, part of the stress of Christmas gift-giving is the feeling that I've spent too much--though I don't really know how much. Ugh, that's a bad feeling. So this year I'm keeping tabs with a simple Excel spreadsheet. I enter the above four categories and it not only calculates my total, it helps me track who I've purchased for.

4. Buy handmade / local / edible / experiential / second-hand gifts, rather than STUFF.
Another part of negative emotion that can cloud Christmas is the feeling that you're merely contributing to the overproduction/overconsumption cycle we Americans are so famous for. Buying gifts that don't come from a department store and won't clutter up someone else's home helps you opt out of that. Plus, supporting local businesses, artisans, farmers' markets, etc. helps your community.

5. Make Your own Simple Gift Wrap.
This may sound like a small thing to stress over, but buying gift wrap is one more expense around the holidays, and using it can be one more waste. This year I plan to follow the example of my inventive neighbors and take apart Trader Joe's paper bags to use as wrapping paper (blank side out), stamping the front of each gift with an inexpensive but pretty Christmas stamp from Michael's. The stamp will be reusable in years to come. This may not be practical with gifts for someone you really want to impress, but for any like-minded recipient (like my husband) it should be fine!

6. Pare Down the Decor
As Dr. Suess once said, "If decor is a chore, less can be more." No, he actually didn't, but if he ever wrote a children's book about lowering stress levels at Christmas, this is what he would have said. Pick some of the your beloved decorations to put out and leave the rest in the garage this year.

7. Opt Out.
If your office / play group / 75-person extended family / Lithuanian Kazoo Players' Guild does an annual gift exchange, would it really be so bad to opt out? Certainly most of us want to give meaningful presents to the people in our lives who mean the most, but if you've been invited to do a gift exchange with people you don't see that often and/or aren't major players in your life, maybe opting out is the lesser of two evils. 

8. Limit to 2-3 Top Activities for December.
The great thing about Christmas is that it comes around every year. Sometimes we can feel the need to pack every fun Christmas-y experience possible into those three to four weeks leading up to the big day. But at a certain point, it simply becomes busyness. Pre-selecting only a small handful of activities to commit to (a performance of A Christmas Carol, ice skating, and one party, let's say) adds more breathing room to the season. There's always next year for the life-size gingerbread house making extravaganza.

9. SERVE!
As you limit your calendar in December, take advantage of the extra time to find a way to serve others in need. There's nothing like it for putting Christmas craziness in perspective. You can be sure local homeless shelters, St. Vincent de Paul, nursing homes, and those they serve will be thankful for your help--and have lots for you to do. 

On that note, I'll leave you with a song that captures my point with this post:


Tuesday, October 29, 2013

Cookie Cutter Ham and Cheese Pockets


At our play group Halloween party, these little gems got quite a bit of buzz. I had several people request the recipe, so I thought I would share it here! I've been making these for four years, since I first saw them in a Woman's Day issue (back when I inexplicably received that magazine in the mail--it just began appearing one month, then disappeared a year or so later. Some anonymous benefactor must have thought I needed help being a woman?)

Anyway, for a four-ingredient recipe, these ham and cheese pockets really shine. The flaky-on-the-outside, tender-on-the-inside pie crust melts in your mouth with the gooey cheese and salty ham. Their greatest virtue is their versatility. You can use any cookie cutter you choose, as long as it's big enough and not too weirdly shaped (reindeer shaped pockets for Christmas might pose a challenge). And of course the filling can be modified as well. If you're a turkey and cheddar fan rather than ham and Swiss, knock yourself out. They store well in the fridge and can be reheated in the oven on warm if you've made them ahead of a party. I like to serve them with a side of honey mustard.

Cookie Cutter Ham and Cheese Pockets
(Adapted from Woman's Day)

Ingredients:

1 box (15oz.) refrigerated pie crusts
8 oz. thinly sliced deli ham
8 oz. sliced Swiss cheese
1 egg, lightly beaten

Directions:

Heat oven to 400 degrees.

On a large surface, unroll pie crusts. Using a rolling pin, roll dough out to approximately 1.5 times its original diameter. Cut crusts into shapes using desired large cookie cutter (3 inch works great). Collect scraps and roll out again to get as many shapes as possible. You will need an even number.

To form pockets, place one slice Swiss cheese and one small portion ham on one cut-out shape. Place a second cut-out shape and on top and press edges together firmly. Place on a greased cookie sheet. Repeat until all dough is used. Cut slits in top crust to allow steam to escape.

Brush tops of pockets with beaten egg. Bake 12-15 minutes.

Makes 9-11 pockets.


Preschool Halloween Party (Games and Recipes!)

The partiers (minus a few who had gone home for naps)

What do you get when you combine Halloween costumes, spooky treats, crazy games, and 20 preschoolers? Chaos! A whole lotta fun! (And one pretty exhausted mama.) This morning was our play group's annual Halloween party. For the last four years, I've been a member of the East Valley Catholic Stay-at-Home Moms' Group (yeah, we have a long name) and had attended this annual event at my friend Marsha's a couple of years ago. Her effort and creativity are the envy of everyone in the group...and oh yeah, she's also an environmental scientist. Did I mention she's awesome? Last year she made 40 Halloween gingerbread houses for the kids to decorate. Dedication, I tell you! So this year, since she moved into a new house only weeks ago, I volunteered to host the party at my place--with a lot of help from Marsha, thankfully! I have to say I think the event was a success. (And get ready--this is a long post.)

Once the dozen or so moms and their little ones gathered at our place at 10, we started out with a craft. For preschoolers, I'm a believer that simpler is better. This craft was decorating an orange paper plate with stickers to make it look like a jack-o-lantern.


Or at least an approximation of a jack-o-lantern...


Next, we headed to the backyard for some games. The lineup was:

1. Pumpkin Penny Toss


This is basically skee-ball on a much smaller (preschool) scale. Have the kids stand behind a line and do their best to toss pennies into the different point level spaces. Super easy!

2. Pin the Nose on the Pumpkin


It's not rocket science, but it sure is fun! This game was store-bought, but you could easily DIY with some tagboard, markers, and double-stick tape.

3. Tootsie Ghost Hunt


The Halloween version of an Easter egg hunt! Kids searched for Kleenex-wrapped Tootsie pop ghosts hidden throughout the yard. The good thing about this kind of hunt is that even if you find the missing Tootsie pops 6 months later, they won't be rotting in a pile of stinky goo like eggs.

4. Mummy Surprise


What, you may ask, is mummy surprise? Good surprise or bad surprise? For this activity, I wrapped prizes (small Halloween foam stamps) in strips of an old white sheet, trying to make the wrapping as convoluted as possible. Kids had to unravel the strips to reveal their prize.

5. Donut Dare


This was, without a doubt, my favorite part of the party. I played this game at camp in junior high and have wanted to play it again ever since. Tie a donut on a string, then hang it from the ceiling with a thumbtack. The idea is for the kids to eat it without using their hands--it's harder than it sounds and hilarious to watch!

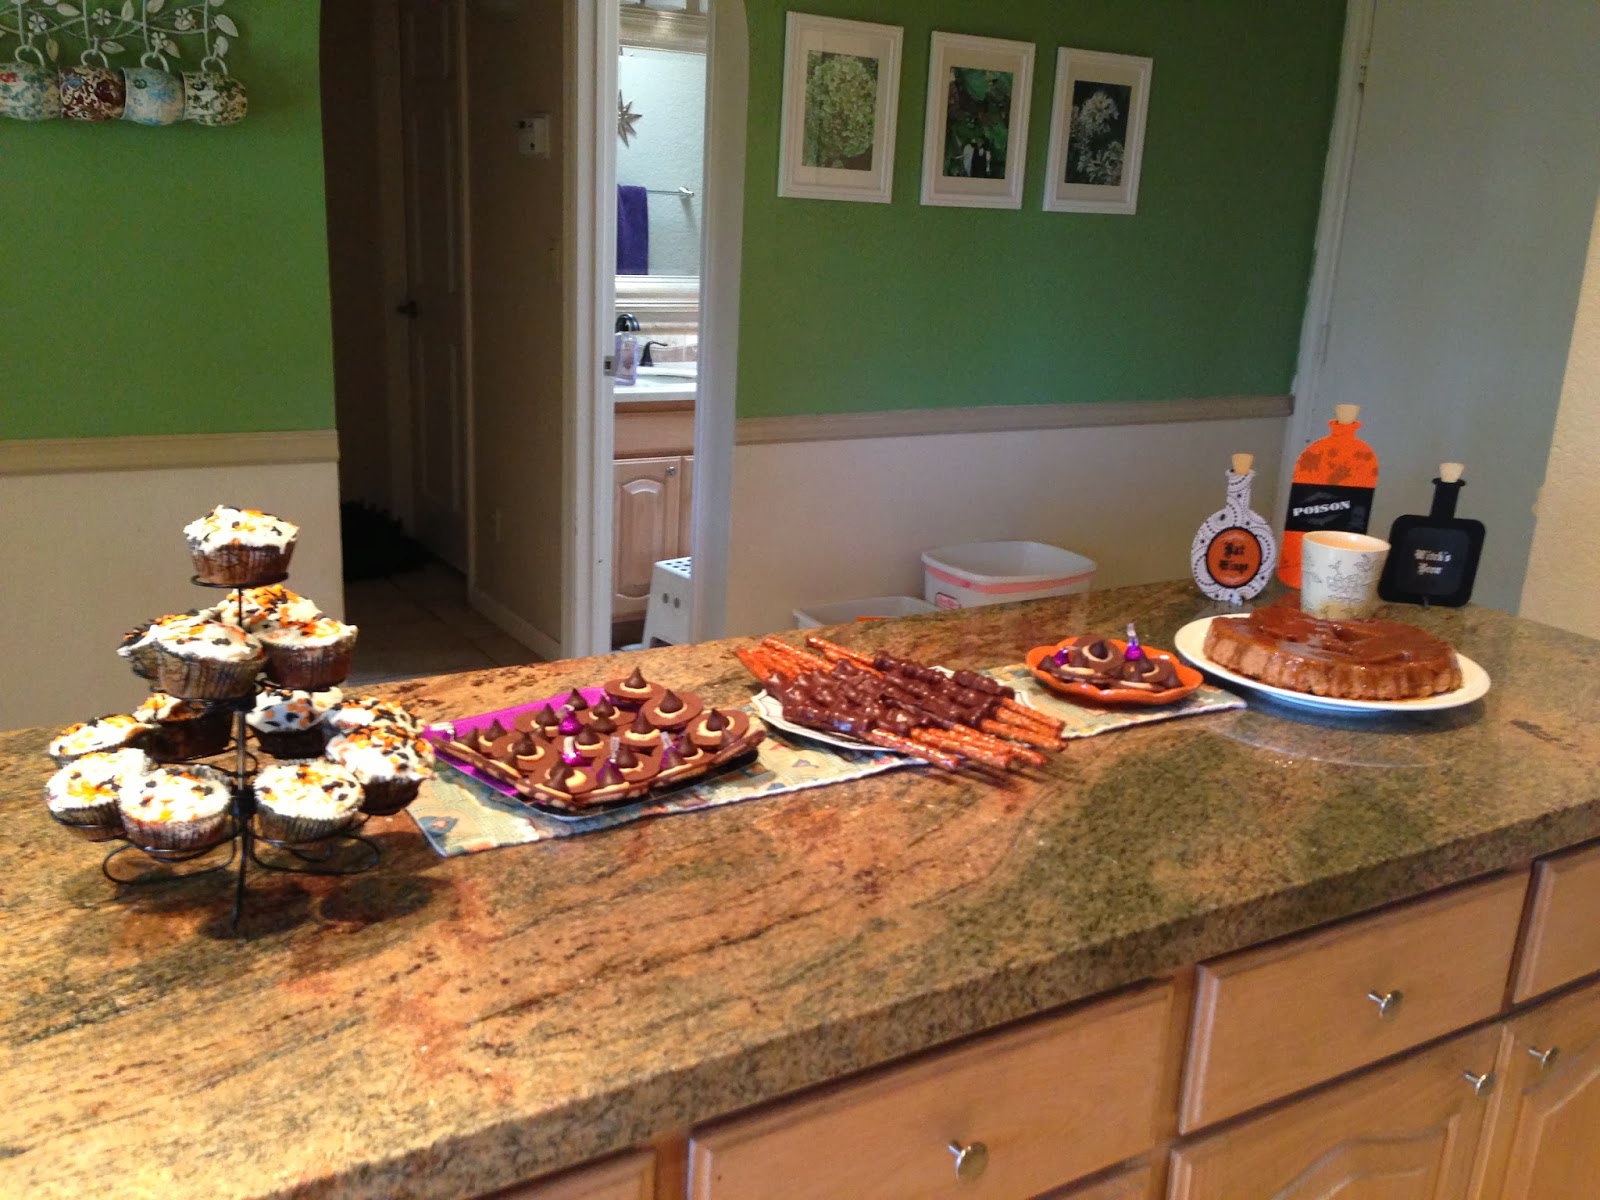
After the games were done, everyone headed inside for a lunch of creepy Halloween-themed treats. (I said the donut game was my favorite part...but this might actually be my favorite part.) Dividing the work with Marsha made for a much lighter workload when it came to feeding 20-25 people a themed lunch. So let's get down to the real business: the food!

The menu:

Main Dish:


Pumpkin-Shaped Cheese Ball with Crackers and Veggies (recipe here)

Spider Deviled Eggs (recipe here)

Pumpkin-Sage Flatbread (recipe here)

(No pics of any of these--sorry! I guess I was busy supervising children eating donuts on strings.)


Boo-nanas


These were adorable...yet tragic. I had pre-made these and frozen them. In getting ready for the party, I unwittingly set them out too early and they got bent and slimy and basically inedible--more like banana worms than banana ghosts. Lesson learned: either eat these fresh or, if you freeze them, eat shortly after taking them out of the freezer.

To make these, slice a banana in half and insert a popsicle stick. Press two chocolate chips in the top for eyes. For presentation, I wrapped blocks of flower foam with patterned scrapbook paper and stuck the boo-nanas into them. 

Eyeball Grape Salad


Cream cheese, sour cream, sugar, vanilla, grapes--that's all it takes to make Eyeball Grape Salad. (Adapted from allrecipes.com)

Ham and Cheese Pumpkin Pockets


I got several recipe requests for these, so I've posted the recipe here. They were a hit!

Desserts:


Desserts! The best part of every holiday!
Pumpkin Chocolate Cupcakes (pictured on the left)

Apple Cake


I baked this delicious recipe in a pumpkin-shaped cake tin. Yeah, it was apple in the shape of a pumpkin. You got a problem with that?

Witch Hat Cookies


Super cute and super easy: take an upside-down Keebler chocolate shortbread cookie, frost with a little bit of peanut butter or orange frosting, top with a Hershey's kiss. 

Chocolate Pretzel Fingers

For this one, you need a mold to get the bony finger effect (pictured above on the right). Experience has taught me that any time you use a mold, SPRAY the dickens out of it with cooking spray before filling. I used chocolate with a little vegetable oil to fill the mold, then added a pretzel rod and coated with the chocolate mixture.

Whew! You still with me? Hopefully this crazy-long post provides some inspiration if you're looking for Halloween treats and activities. Our little party was some good, wholesome fun for some adventurous preschoolers. And if you ask me, that's way more enjoyable than the give-you-nightmares-for-a-week variety of Halloween. I'm for it. :)